Introduction
Have you booked your Quest appointment and want to cancel it? Do you want a step-by-step guide about how to cancel Quest Appointment?
In this article, we have given a detailed step-by-step tutorial about how can you cancel your appointment easily. Follow our tutorial and perform the steps to cancel your appointment.
Table of Contents
What is Quest Appointment?
Quest Diagnostics is an American clinical diagnostics laboratory, that provides patient care and health services in immunology, molecular diagnostics, infectious diseases, and cardiology.
It operates in the United States, Puerto Rico, Mexico, and Brazil and has also collaborated with multiple hospitals and clinics across the globe.

How to Cancel Quest Appointment?
If you are already booked your appointment on Quest and want to delete your Quest Scheduled Appointment then you can delete it by following 3 different methods.
1. How to cancel Quest Appointment when you have the Appointment Confirmation Code?
When you have scheduled your appointment for any Diagnostics on Quest, one Confirmation Code along with the Date and Time, Location and an appointment confirmation message is provided to you.
If you have the Confirmation Code with you, then just follow the below steps to cancel your Diagnostics appointment.
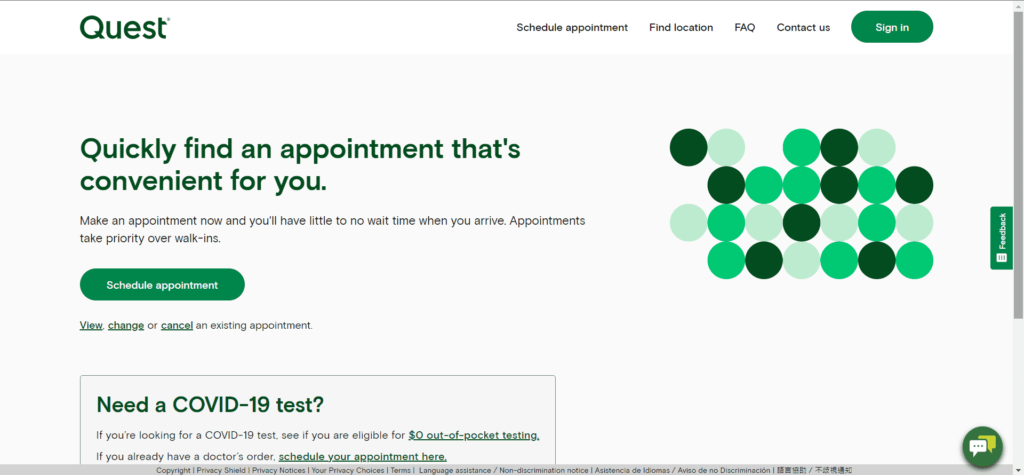
1. Visit the Quest Schedule Appointment page
Go to the Quest Schedule Appointment page on your browser.
2. Click on Cancel Appointment
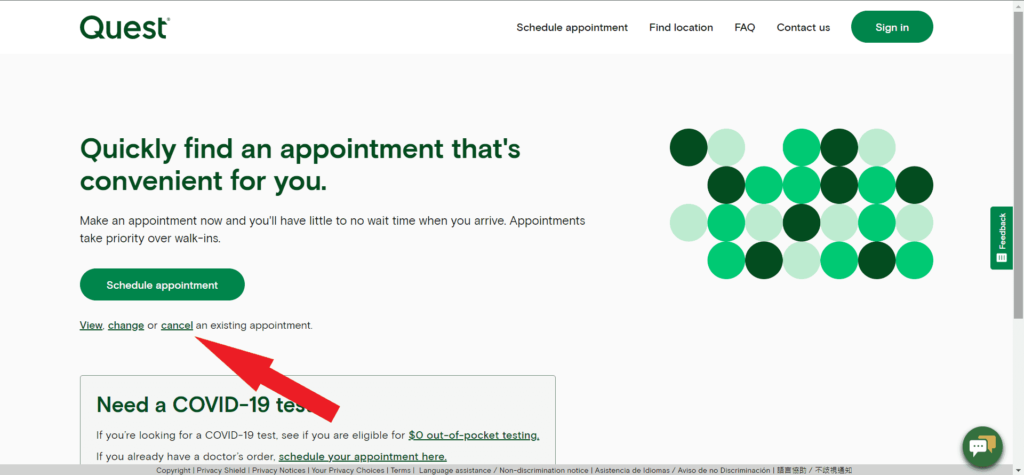
Once you will be on the home page of the Quest Schedule Appointment page, find a link “cancel an existing appointment” must be available under the schedule appointment button.
Now, click on the Cancel link, and one Cancel your appointment popup will be displayed.
3. Enter your Confirmation Code
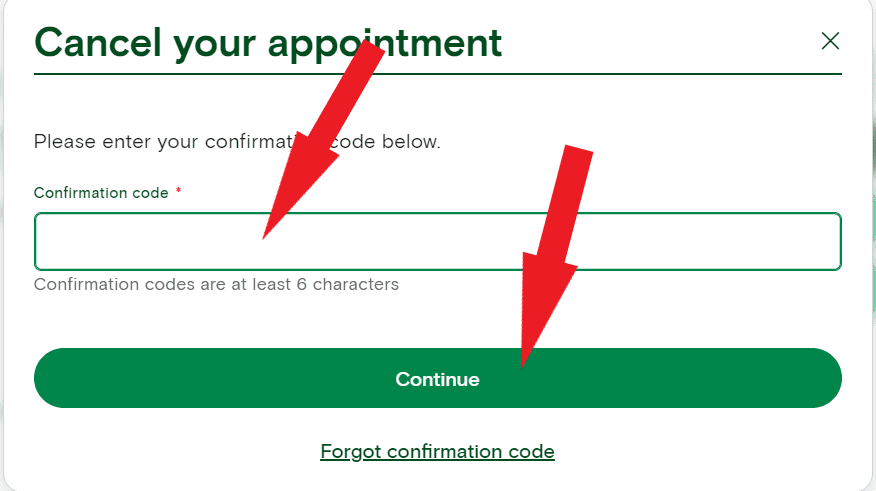
After the pop-up will be displayed, enter your Confirmation code and click on the Continue button.
4. Verify your Identity
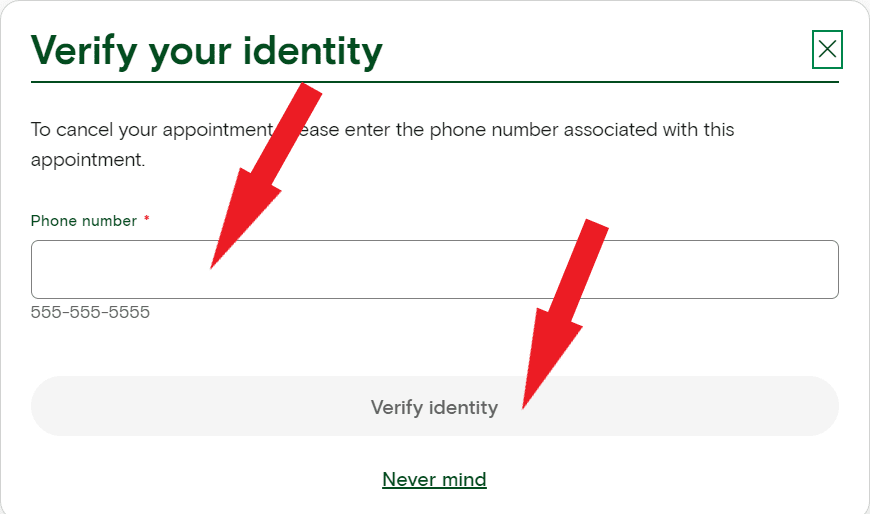
The application may ask you to verify your identity by providing the phone number associated with the appointment.
Just enter your phone number and click on the Verify Identity button.
5. Confirm Canellation
Once you will verify your identity, Quest will ask for your confirmation for the appointment cancellation with appointment details.
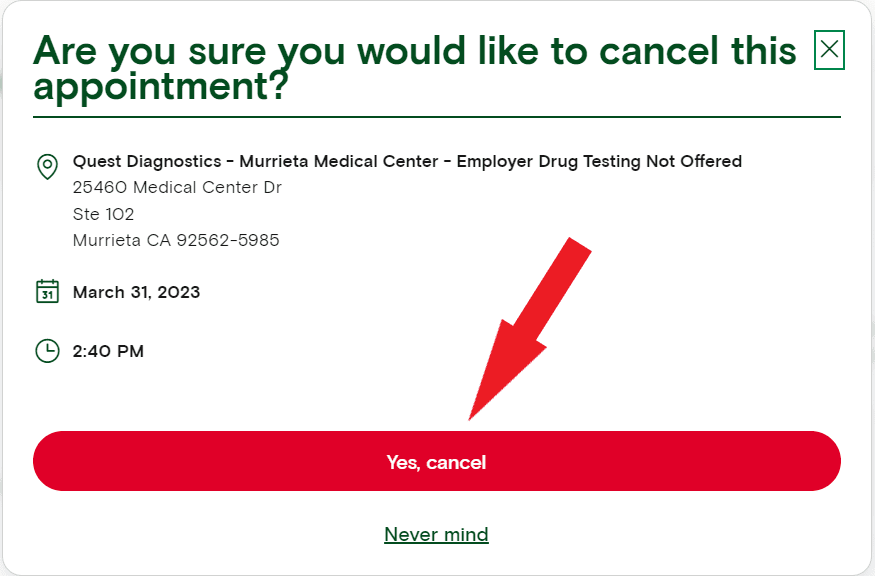
Click on the Yes, cancel button to cancel your appointment successfully and one success message “Appointment cancelled” will be displayed. However, you can also schedule an appointment again.
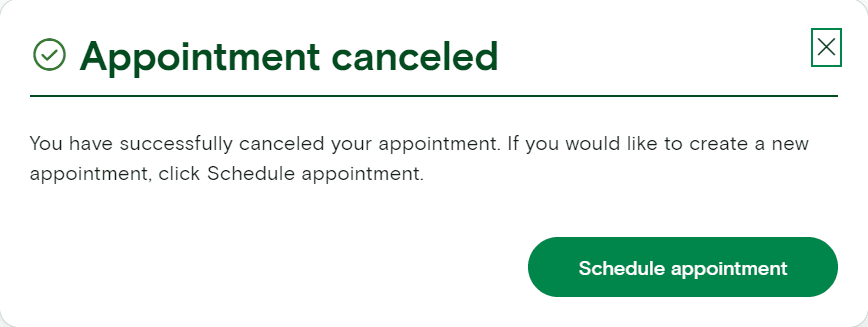
Note: You can also find your Confirmation Code on your appointment confirmation email received at your registered email address.
2. How to cancel Quest Appointment when you don’t have the Appointment Confirmation Code?
If you forget your confirmation code or lost your appointment confirmation code email, then don’t worry. You can follow the below steps to cancel your appointment easily.
First, follow Step-1 and Step-2 of the previous method “Cancel your appointment when you have the confirmation code” and then follow the below steps. You just need to go to the Quest Schedule Appointment page and click on the Cancel link.
3. Click on Forgot confirmation code
Once the Pop-up will be displayed, click on the Forget confirmation code link.
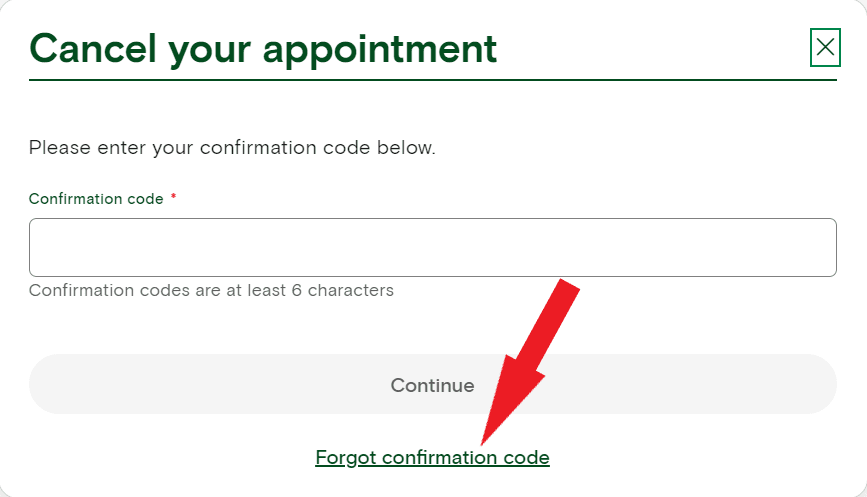
4. Recieve appointment details
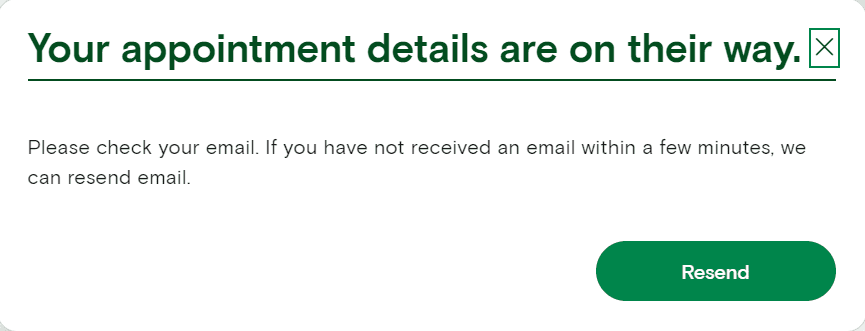
Once you will click on the Forget confirmation code link, another Pop-up titled “Forgot confirmation code?” will be displayed. Provide your email address or phone number used to create your appointment and click on the Send details button.
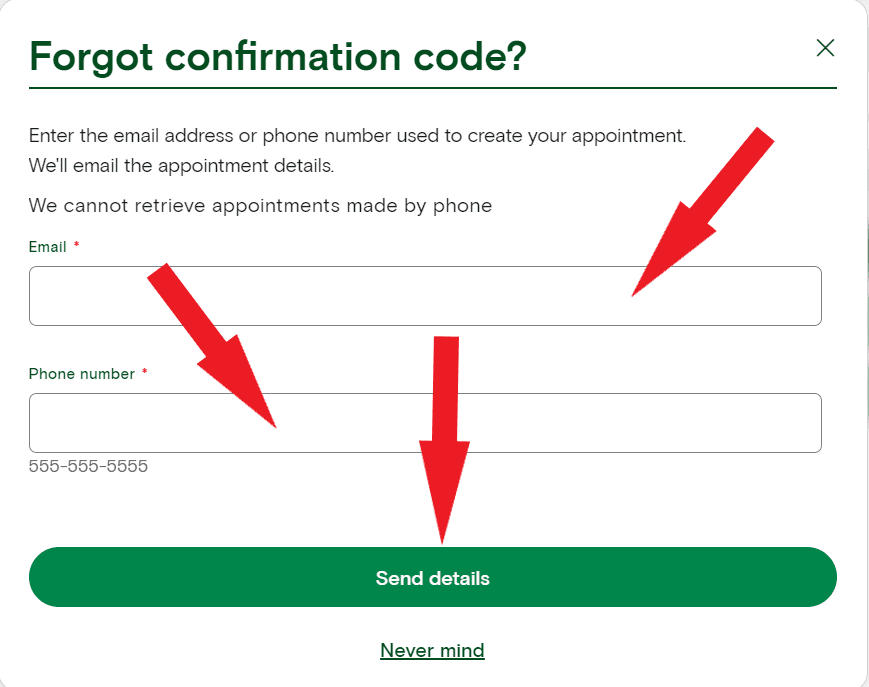
Appointment details will be sent to your email address, check the received email for details.
5. Go to Appointment details
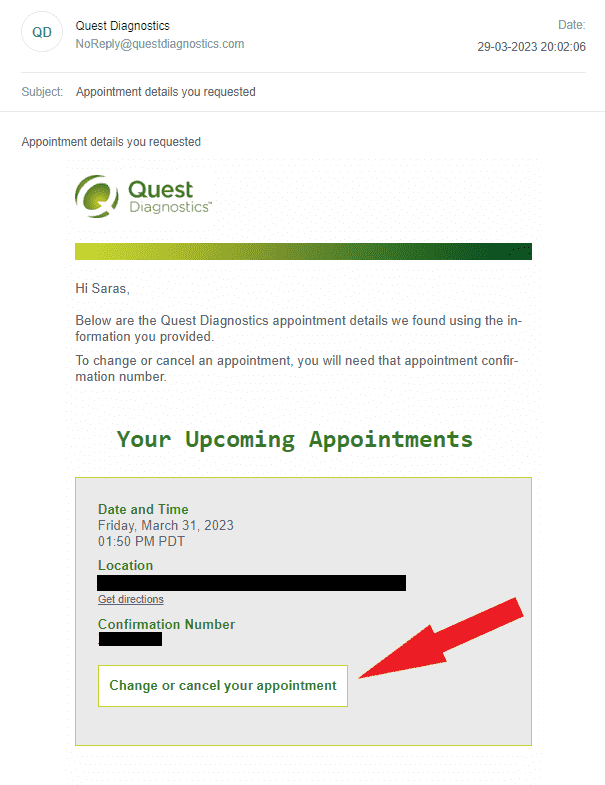
In the Appointment details email, appointment details with a Change or cancel your appointment link will be displayed. Click on this link, you will be navigated to the Appointment summary page.
6. Click the Cancel Appointment Link
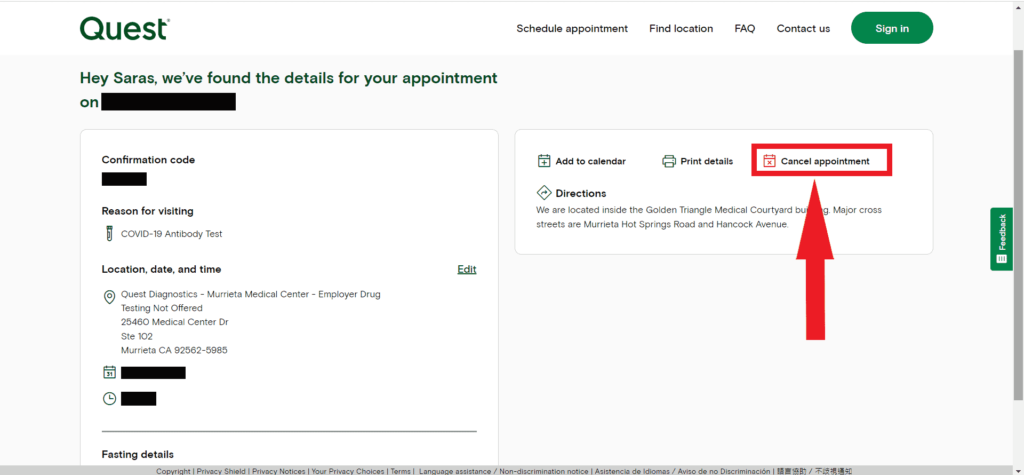
Now click on the Cancel appointment link present on the Appointment summary page as shown below, and one Pop-up “Verify your identity” will be displayed.
Now follow Step-4 & Step-5 of the previous method to cancel your appointment successfully.
3. How to cancel Quest Appointment when you are signed in?
If you are already signed in on the Quest Schedule Appointment site and want to cancel your upcoming appointment, then follow the below steps:
1. Click on View upcoming appointments Link
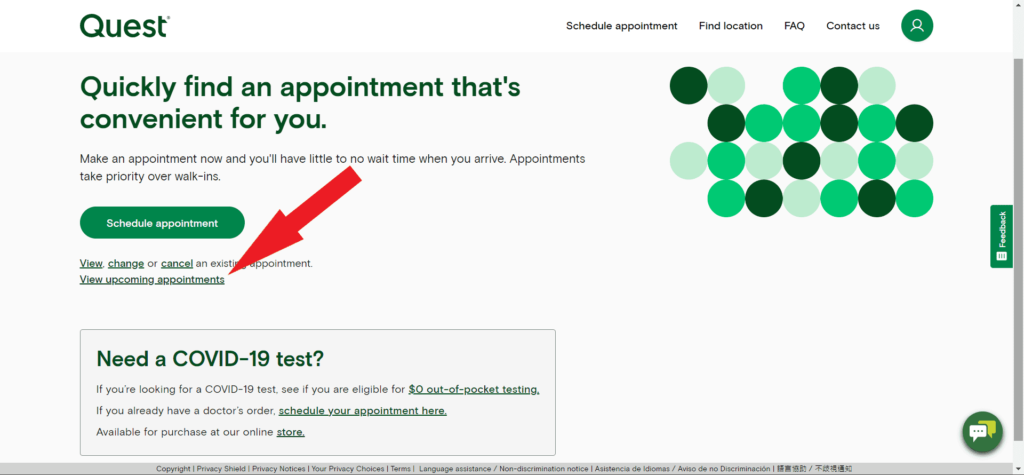
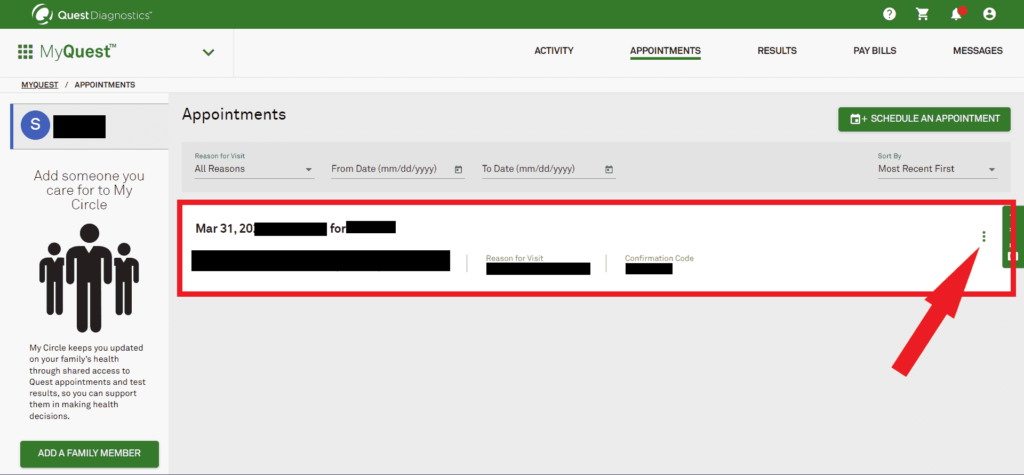
As you are already signed in, you can see the View upcoming appointments link on the home screen. Click on this link, you will be navigated to the Appointments page. A list of all of your upcoming appointments will be displayed.
2. Click on Menu
Find the upcoming appointment that you want to cancel and click on the Menu icon available on the right side of the appointment.
3. Choose the Cancel option
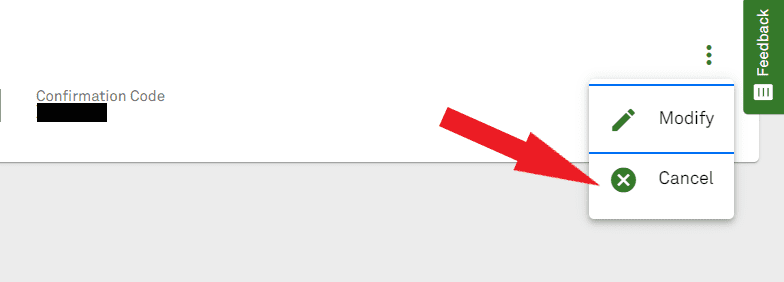
Once you will click on the Menu icon, Modify and Cancel options will be displayed. Click on the Cancel option. It will navigate you to a new page where the same pop-up “Are you sure you would like to cancel this appointment?” as previous methods will be displayed.
4. Confirm Canellation
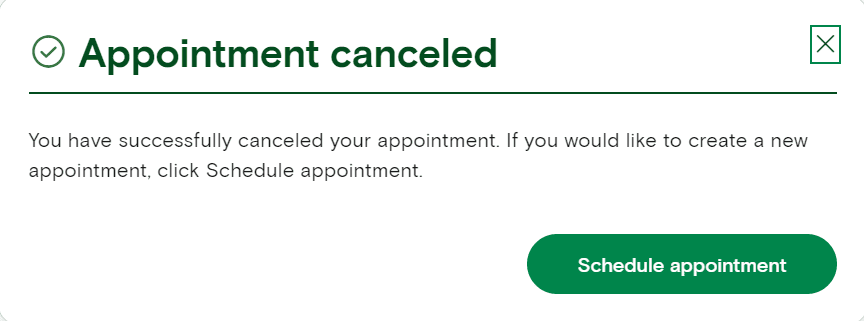
Click on the Yes, cancel button to cancel your appointment successfully and one success message “Appointment cancelled” will be displayed.

Alternatively, you can also call Quest Diagnostics customer service at 1-866-697-8378 to cancel your appointment. Make sure you have your Confirmation Code ready when you call.
Conclusion
Hopefully, by following this article, you can be able to cancel your Quest appointment. You can choose any of the above methods to cancel your appointment. If needed you can also book the appointment again for the same date and time again by using the same method as you have booked the appointment before.
Other Queries We Have Covered
- Cancel Quest Appointment when you are signed in
- Quest Cancel Appointment
Recommended Posts
- How to Delete Temu Account? : 6 Easy Steps
- Best 2 Ways to Delete FetLife Account
- Best 2 Ways to Delete Evony Account
- How to Delete UltraSurf for Chrome?
- How to Cancel Brazzers Account? – 3 Easy Way